Python Examples
The examples folder of the
repository has examples that build and simulate circuits in code. Most of them write a VCD
file with all signals. The ready-made circuits for the DigSim application are on
GUI Examples.
To run them, clone the repository and run the commands below from its root folder (see Run from source):
git clone https://github.com/freand76/digsim.git
cd digsim
The waveform images on this page are rendered from the VCD files that the examples write.
To look at the waveforms yourself, open the VCD file in
GTKWave or another VCD viewer, for example
gtkwave sr.vcd.
SR latch
examples/example_sr.py
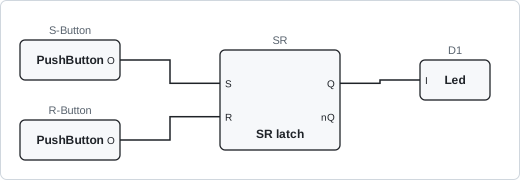
connects two push buttons to the set and reset inputs of an SR latch (built from two NOR
gates) and the latch output to an LED. The script presses the buttons in a fixed sequence,
and a callback prints the LED state every time it changes.
uv run python examples/example_sr.py
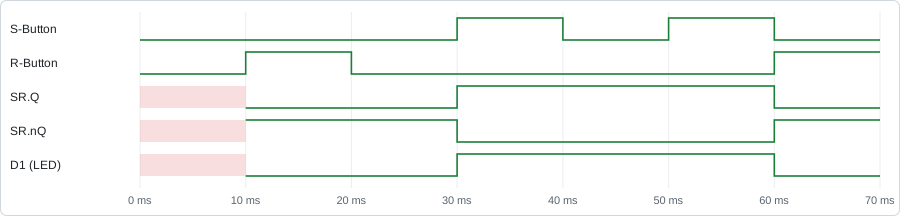
The left column is the simulation time in nanoseconds. Pressing set a second time does not change the output, the latch is already set:
        0:LED: 'D1' is OFF
Reset
 10000001:LED: 'D1' is OFF
Set
 30000002:LED: 'D1' is ON
Set (again)
Reset
 60000001:LED: 'D1' is OFF
The waveforms are written to sr.vcd. The latch output is unknown (red) until the first
reset:
Clock
examples/example_clock.py
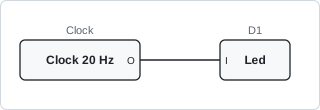
connects a 20 Hz clock to an LED and simulates one second.
uv run python examples/example_clock.py
The LED toggles every 25 ms (half a 20 Hz period):
        0:LED: 'D1' is OFF
        0:LED: 'D1' is OFF
 25000000:LED: 'D1' is ON
 50000000:LED: 'D1' is OFF
 75000000:LED: 'D1' is ON
...
975000000:LED: 'D1' is ON
1000000000:LED: 'D1' is OFF
The first 300 ms of clock.vcd:

Save a circuit (pulse generator)
examples/load_save/example_save_circuit.py
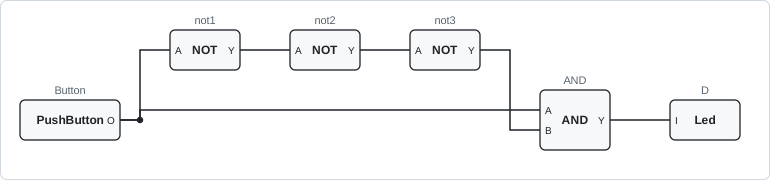
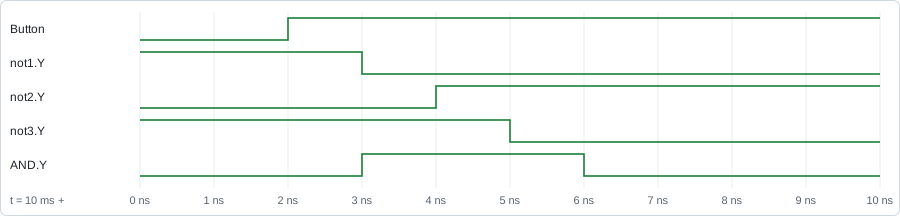
builds a pulse generator: a push button drives one AND input directly and the other through
three NOT gates. The circuit is simulated, saved to pulse_circuit.json, loaded into a new
circuit and simulated again.
uv run python examples/load_save/example_save_circuit.py
When the button is pressed, both AND inputs are high for a moment, until the change has propagated through the three NOT gates (1 ns each). The LED is on for 3 ns. The second half of the output comes from the loaded copy of the circuit:
        0:LED: 'D' is OFF
        1:LED: 'D' is OFF
ON
 10000001:LED: 'D' is ON
 10000004:LED: 'D' is OFF
OFF
        1:LED: 'D' is OFF
  5000001:LED: 'D' is ON
  5000004:LED: 'D' is OFF
The waveforms in pulse.vcd, zoomed in on the button press at 10 ms, show the change
moving through the gates:
Load a circuit (logic gates)
examples/load_save/example_load_circuit.py
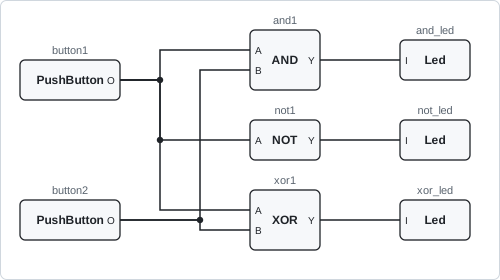
loads the circuit in
example_circuit.json:
two buttons connected to an AND, a NOT and an XOR gate, each driving an LED. The script
presses the buttons in a sequence and prints the LED changes.
uv run python examples/load_save/example_load_circuit.py
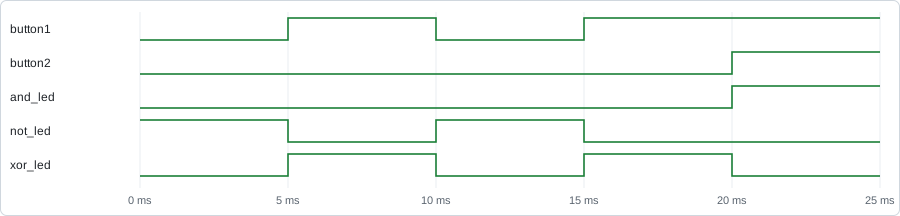
The ------------ lines show the button states (button1 button2) for the next step:
        1:LED: 'and_led' is OFF
        1:LED: 'xor_led' is OFF
        1:LED: 'not_led' is ON
------------ 10
  5000001:LED: 'not_led' is OFF
  5000001:LED: 'xor_led' is ON
------------ 00
 10000001:LED: 'not_led' is ON
 10000001:LED: 'xor_led' is OFF
------------ 10
 15000001:LED: 'not_led' is OFF
 15000001:LED: 'xor_led' is ON
------------ 11
 20000001:LED: 'and_led' is ON
 20000001:LED: 'xor_led' is OFF
The waveforms in circuit.vcd:
Verilog counter
The two examples in
examples/yosys_counter
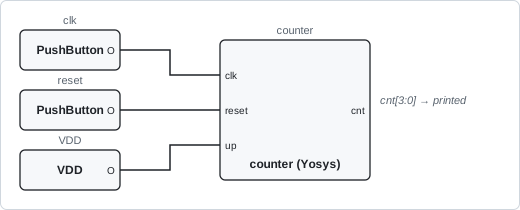
simulate the 4-bit counter in
counter.v:
example_yosys_counter_netlist.pyloads the pre-synthesized netlistcounter.json.example_yosys_counter_verilog.pyloadscounter.vand synthesizes it on the fly.
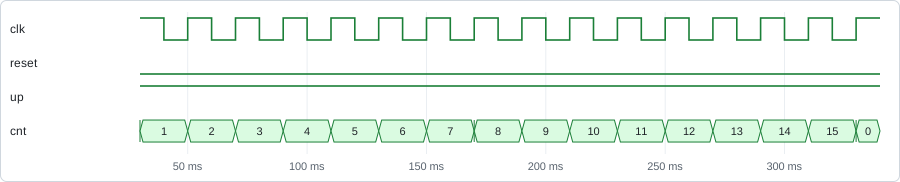
Both connect push buttons to the clock and reset inputs and tie the up input high,
reset the counter and then clock it 16 times.
uv run python examples/yosys_counter/example_yosys_counter_netlist.py
uv run python examples/yosys_counter/example_yosys_counter_verilog.py
Both print the same output, the counter value before each clock pulse:
===================== Reset ==========================

counter
 - I:clk=0
 - I:reset=0
 - I:up=1
 - O:cnt=0

===================== Start ==========================

OUT 0
OUT 1
OUT 2
...
OUT 14
OUT 15
counter.vcd is started after the reset:
Synthesis (Fibonacci sequence)
examples/synthesis/example_synthesis.py
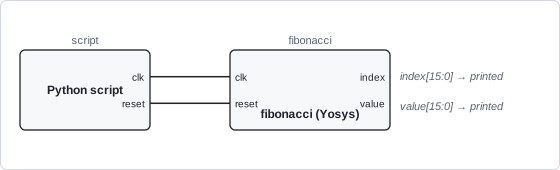
synthesizes fibonacci.v,
a Fibonacci sequence generator, with Yosys from Python, loads the netlist as a component and
drives its clock and reset inputs directly from the script.
uv run python examples/synthesis/example_synthesis.py
Start synthesis of 'examples/synthesis/fibonacci.v'
Synthesis done!
...
Fibonacci sequence [0] value is 0
Fibonacci sequence [1] value is 1
Fibonacci sequence [2] value is 1
Fibonacci sequence [3] value is 2
Fibonacci sequence [4] value is 3
Fibonacci sequence [5] value is 5
...
Fibonacci sequence [14] value is 377
Fibonacci sequence [15] value is 610
The netlist is written to examples/synthesis/fibonacci.json and the waveforms to
fibonacci.vcd:

6502 CPU
examples/yosys_6502/example_yosys_6502.py
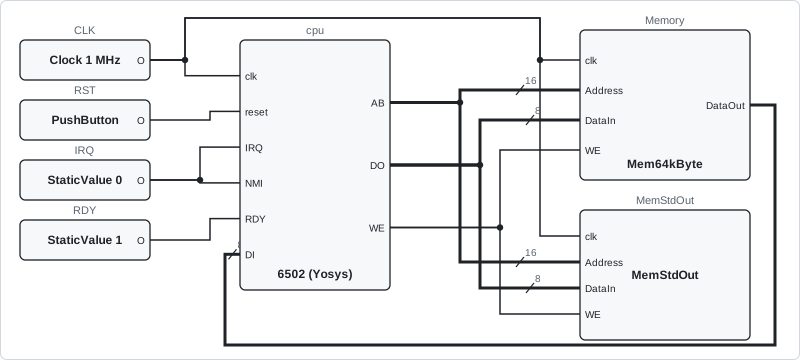
simulates a synthesized 6502 CPU
(6502_primitives.json) connected to a 64 kB RAM and a memory-mapped text output at address
0x8000. The program is preloaded into the RAM at 0xF800 from code.bin, built from
code.s. It
writes "Hello World" to the text output, which prints each character.
uv run python examples/yosys_6502/example_yosys_6502.py
The simulation of 300 clock cycles takes less than a second, and the example prints how many clock cycles it simulated per second:
cpu
 - I:clk=0
 - I:reset=0
 - I:DI=X
 - I:IRQ=0
 - I:NMI=0
 - I:RDY=1
 - O:AB=X
 - O:DO=X
 - O:WE=X
StringOutput [char]: 'H'
StringOutput [char]: 'e'
StringOutput [char]: 'l'
StringOutput [char]: 'l'
StringOutput [char]: 'o'
StringOutput [char]: ' '
StringOutput [char]: 'W'
StringOutput [char]: 'o'
StringOutput [char]: 'r'
StringOutput [char]: 'l'
StringOutput [char]: 'd'
StringOutput [line]: 'Hello World'
Simulated 302 clock cycles of 6502_primitives.json in 0.41 s: 728 clocks/second
6502_primitives.json is the CPU synthesized into gates. Add --functional to run
6502_functional.json instead, the same CPU synthesized into functional blocks like
adders and multiplexers (see
Gates or functional blocks):
uv run python examples/yosys_6502/example_yosys_6502.py --functional
...
StringOutput [line]: 'Hello World'
Simulated 302 clock cycles of 6502_functional.json in 0.26 s: 1147 clocks/second
verilog/synth.sh in the repository synthesizes both netlists.
Add --signals to make the internal signals of the CPU readable (see
Internal signals and states). The example then
prints the registers after the simulation, and with --vcd the waveforms have the
signals inside the CPU too, with the state of the CPU as the names of its states:
uv run python examples/yosys_6502/example_yosys_6502.py --functional --signals
...
CPU: PC=F82E A=00 X=00 Y=0C S=FF P=37 state=DECODE
Waveforms are not written by default, since writing every signal in the CPU makes the
simulation slower. Add --vcd to write them to 6502.vcd, or --vcd <file> to choose the
file name:
uv run python examples/yosys_6502/example_yosys_6502.py --vcd
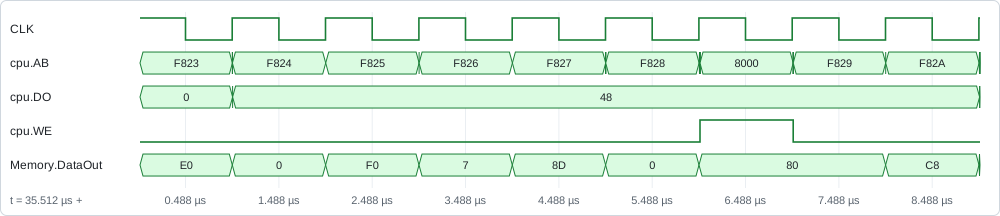
The waveforms below (values in hex) show the CPU fetching the program from F823 and
onwards, then writing 48, the character H, to the text output at address 8000:
To change the program, edit the assembly files and rebuild code.bin with compile.sh,
which needs the cc65 assembler and linker.
State machine (traffic light)
examples/yosys_fsm/example_yosys_fsm.py
simulates a traffic light, a state machine in
traffic_light.sv
with its states as a SystemVerilog enum. A request turns the light from red to green, and
back after a while. The component is created with signals=True, so its internal signals,
the state and a timer, are readable, and the state has the names of the enum:
light = YosysComponent(circuit, path="traffic_light.sv", functional=True, signals=True)
light.state("state")  # "RED", "RED_YELLOW", "GREEN" or "YELLOW"
uv run python examples/yosys_fsm/example_yosys_fsm.py
Internal signals: state, timer
   10 ms: RED
  200 ms: RED after the reset
  260 ms: RED_YELLOW
  460 ms: GREEN
  960 ms: YELLOW
 1160 ms: RED
The example writes traffic_light.vcd, with the state as a number and, in state_name,
as text, the name of the state:
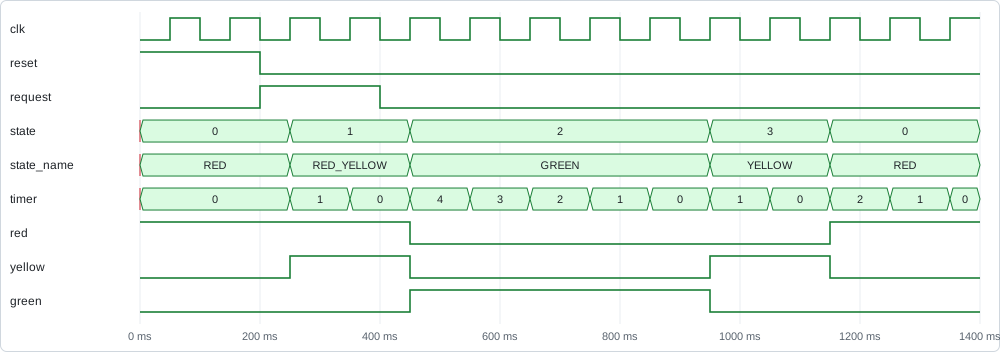
In the VCD file the state is a wire, and its name a string variable:
$var wire 2 0! state $end
$var string 1 1! state_name $end
...
#250000001
b1 0!
sRED_YELLOW 1!
...
#450000001
b10 0!
sGREEN 1!
Bus registers (inout ports)
examples/yosys_inout/example_yosys_inout.py
puts two registers on a shared 8-bit data bus, with a tristate buffer that drives the bus
like a CPU. The register,
bus_register.v,
has a bidirectional inout data port: it drives its value on the bus while oe is high,
and stores the value on the bus at a clock edge while we is high. The inout ports drive
each other, see Inout ports:
cpu.Y.wire = reg_a.data
cpu.Y.wire = reg_b.data
reg_a.data.wire = reg_b.data
reg_b.data.wire = reg_a.data
The CPU writes 0x5a to the first register, which then drives it on the bus for the second
register to store. bus is the value on the bus that the first register reads, and
a drives what it drives itself:
uv run python examples/yosys_inout/example_yosys_inout.py
Start, nothing drives the bus      bus=Z    a drives=Z    a=0x00 b=0x00
CPU drives 0x5a                    bus=0x5a a drives=Z    a=0x00 b=0x00
Register a stores it               bus=0x5a a drives=Z    a=0x5a b=0x00
Register a drives the bus          bus=0x5a a drives=0x5a a=0x5a b=0x00
Register b stores it               bus=0x5a a drives=0x5a a=0x5a b=0x5a
Register b drives the bus          bus=0x5a a drives=Z    a=0x5a b=0x5a
CPU drives 0x33 too (contention)   bus=X    a drives=Z    a=0x5a b=0x5a
Nothing drives the bus             bus=Z    a drives=Z    a=0x5a b=0x5a
pytest testbenches
examples/pytest_tb tests
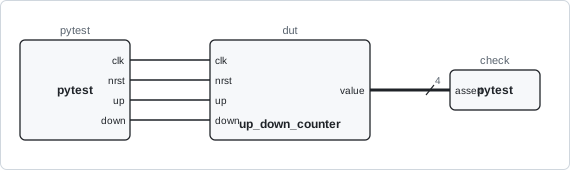
two Verilog designs with pytest: an 8-bit ALU (alu.v) and a 4-bit
up/down counter (up_down_counter.v). Each test module synthesizes its design in a fixture,
drives the inputs from Python and asserts on the outputs. See
Verilog Testbench with pytest for how they work.
uv run --with pytest pytest -v examples/pytest_tb
examples/pytest_tb/test_alu_testbench.py::test_add PASSED
examples/pytest_tb/test_alu_testbench.py::test_sub PASSED
examples/pytest_tb/test_alu_testbench.py::test_and PASSED
examples/pytest_tb/test_alu_testbench.py::test_or PASSED
examples/pytest_tb/test_alu_testbench.py::test_xor PASSED
examples/pytest_tb/test_alu_testbench.py::test_logic_lshift PASSED
examples/pytest_tb/test_alu_testbench.py::test_logic_rshift PASSED
examples/pytest_tb/test_alu_testbench.py::test_arith_rshift PASSED
examples/pytest_tb/test_up_down_counter_testbench.py::test_no_count PASSED
examples/pytest_tb/test_up_down_counter_testbench.py::test_count_up PASSED
examples/pytest_tb/test_up_down_counter_testbench.py::test_count_down PASSED
examples/pytest_tb/test_up_down_counter_testbench.py::test_up_precedence PASSED
examples/pytest_tb/test_up_down_counter_testbench.py::test_reset_after_count PASSED
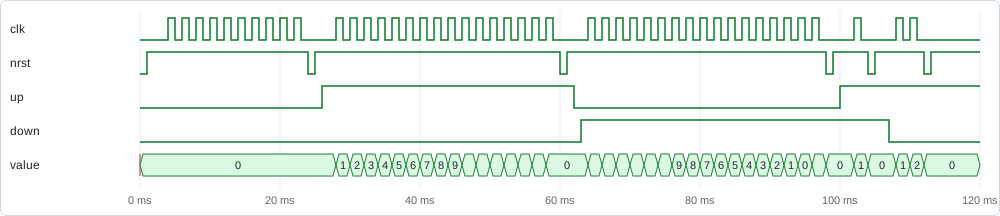
The tests write alu_test.vcd and up_down_counter_test.vcd. The counter tests, one after
the other: no counting, counting up to 15 and wrapping to 0, counting down, and resets:
Subcircuit (full adder)
examples/subcircuit/example_subcircuit.py
uses the full adder of the GUI example circuits, circuits/subcircuits/full_adder.circuit, as a
SubCircuit, a component made from a circuit file. The full adder is made from two half
adder subcircuits itself. Its ports are the In and Out ports of the file, and the example
prints its truth table:
uv run python examples/subcircuit/example_subcircuit.py
 a  b cin |  s cout
 0  0  0  |  0   0
 0  0  1  |  1   0
 0  1  0  |  1   0
 0  1  1  |  0   1
 1  0  0  |  1   0
 1  0  1  |  0   1
 1  1  0  |  0   1
 1  1  1  |  1   1